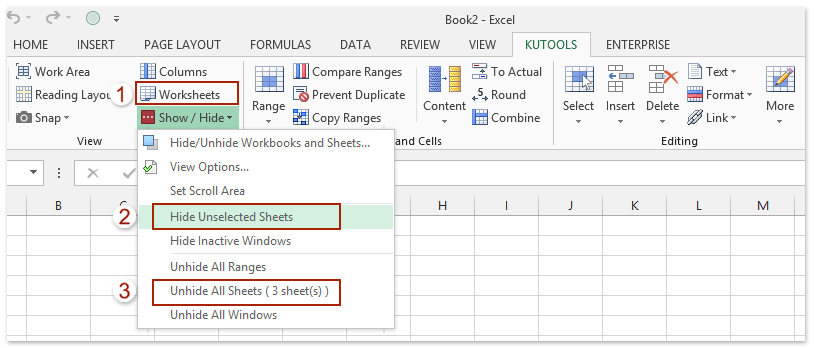
One click to hide/unhide one or multiple sheet tabs in Excel
Kutools
for Excel provides many handy utilities for Excel users to quickly
toggle hidden sheet tabs, hide sheet tabs, or display hidden sheet tabs
in Excel.
(1) Kutools > Worksheets: One click to toggle all hidden sheet tabs to be visible or invisible in Excel;
(2) Kutools > Show / Hide > Hide Unselected Sheets: One click to hide all sheet tabs except active one (or selected ones) in Excel;
(3) Kutools > Show / Hide > Unhide All Sheets: One click to display all hidden sheet tabs in Excel.
Hide one or multiple selected sheet tabs with Hide & Unhide feature
 And then you will see all selected sheet tabs are hidden from the Sheet Tab bar. See screenshot:
Display one hidden sheet tab with Hide & Unhide feature
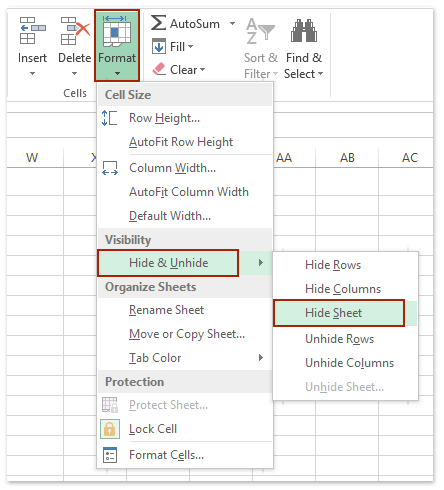
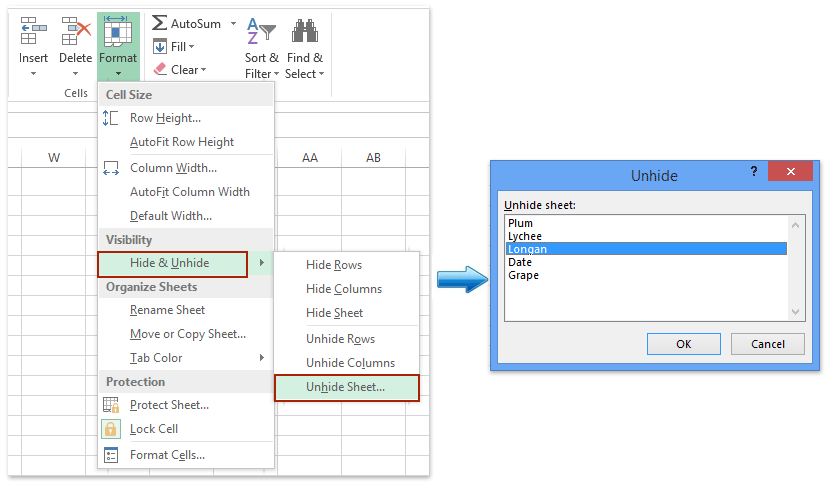
1. Click Home > Format > Hide & Unhide > Unhide Sheet.
2. In the opening Unhide dialog box, select the sheet tab which you want to display in the Sheet Tab bar, and click the OK button. See screenshot:
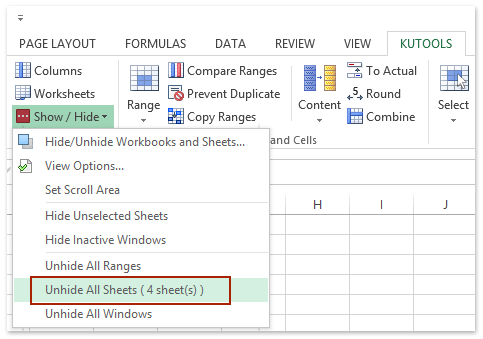
 Display all hidden sheet tabs with only one click
Just click Kutools > Show / Hide > Unhide All Sheets to batch display all hidden sheet tabs at once. See screenshot:
Free Download Kutools for Excel Now
(1) Kutools > Worksheets: One click to toggle all hidden sheet tabs to be visible or invisible in Excel;
(2) Kutools > Show / Hide > Hide Unselected Sheets: One click to hide all sheet tabs except active one (or selected ones) in Excel;
(3) Kutools > Show / Hide > Unhide All Sheets: One click to display all hidden sheet tabs in Excel.
Hide one or multiple selected sheet tabs with Hide & Unhide feature
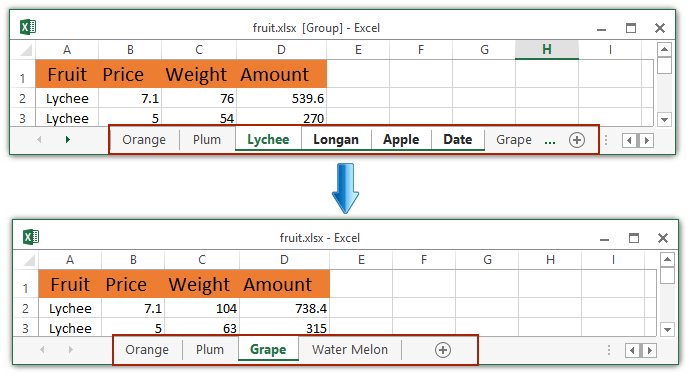
We can apply Excel’s Hide & Unhide feature to hide one or multiple selected sheet tabs easily.
1. Select one or multiple sheet tabs you will hide in the Sheet Tab bar.
Note:
(1) Holding the Shift key, you can select multiple adjacent sheet tabs with clicking the first sheet tab and the last one in the Sheet Tab bar;
(2) Holding the Ctrl key, you can select multiple nonadjacent sheet tabs with clicking each sheet tab in the Sheet Tab bar one by one.
2. Click Home > Format > Hide & Unhide > Hide Sheet. See screenshot:
Display one hidden sheet tab with Hide & Unhide feature
1. Click Home > Format > Hide & Unhide > Unhide Sheet.
2. In the opening Unhide dialog box, select the sheet tab which you want to display in the Sheet Tab bar, and click the OK button. See screenshot:
Hide all sheet tabs except active/selected one with only one click
Just click Kutools > Show / Hide > Hide Unselected Sheets. And then all sheet tabs are hidden except the active one.
Note: For hiding all sheet tabs except selected ones, please select these sheet tabs you will not hide in the Sheet Tab bar, and then click Kutools > Show / Hide > Hide Unselected Sheets.
Free Download Kutools for Excel Now
Note: For hiding all sheet tabs except selected ones, please select these sheet tabs you will not hide in the Sheet Tab bar, and then click Kutools > Show / Hide > Hide Unselected Sheets.
Free Download Kutools for Excel Now
Just click Kutools > Show / Hide > Unhide All Sheets to batch display all hidden sheet tabs at once. See screenshot:
Free Download Kutools for Excel Now
 Display or hide the entire Sheet Tab Bar to display/hide all sheet tabs with Excel Options
We can display or hide the entire Sheet Tab Bar to display/hide all sheet tabs by Excel's Options. Please do as follows:
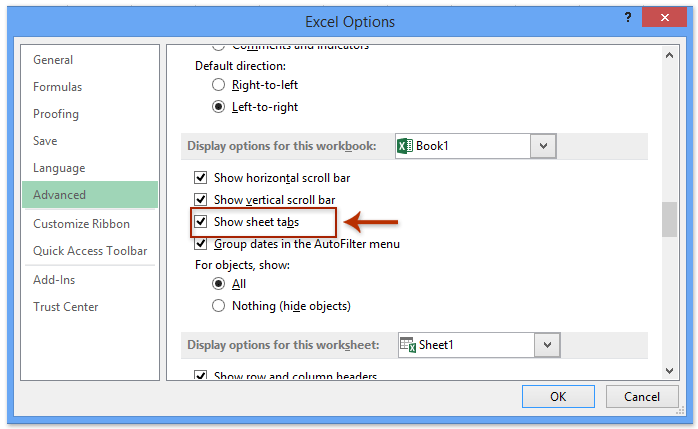
1. Click the File > Options (or  > Excel Options) to open the Excel Options dialog box.
2. In the Excel Options dialog box, please do as follows:
(1) Click the Advanced in left bar;
(2) Check or uncheck the Show sheet tabs option in the Display options for this workbook section;
3. Click the OK button.
All of the worksheet tabs will be displayed or hidden.
> Excel Options) to open the Excel Options dialog box.2. In the Excel Options dialog box, please do as follows:
(1) Click the Advanced in left bar;
(2) Check or uncheck the Show sheet tabs option in the Display options for this workbook section;
3. Click the OK button.
All of the worksheet tabs will be displayed or hidden.
Display or hide the entire Sheet Tab Bar to display/hide all sheet tabs with VBA code
The following two simple VBA codes also can help you to hide or show the sheet tabs.
1. Click Developer > Visual Basic, and a new Microsoft Visual Basic for applications window will display, click Insert > Module, and then input the following codes in the module.
2. Then click Run button to run the code. You will get the result as you want.
1. Click Developer > Visual Basic, and a new Microsoft Visual Basic for applications window will display, click Insert > Module, and then input the following codes in the module.
VBA code to hide Sheet Tab Bar:
1
2
3
| Sub Macro()ActiveWindow.DisplayWorkbookTabs = FalseEnd Sub |
VBA code to show Sheet Tab Bar:
1
2
3
| Sub Macro()ActiveWindow.DisplayWorkbookTabs = TrueEnd Sub |
 , and then click Excel Options. In the Advanced category, under Display options for this workbook, look at the Show sheet tabs check box. Is it cleared? If so, select it, and then click OK.
 Now look at Outlook on your computer:


