-
Duplicate the slide that has the table you want to animate. Leave the first instance of the slide untouched. For now, it is your backup, in case you have difficulty with this process, or in case you want to reuse the table later in this presentation or in another one. To duplicate the slide, select the thumbnail of the slide in the left margin in Normal view. On the Home tab of the ribbon, click the arrow next to the Copy button and then click Duplicate.
-
One the duplicate slide you've created, point to a border of the table, and click to select the entire table.
-
On the Home tab of the ribbon, in the Clipboard group, click Copy.
-
In the Clipboard group, click the arrow under Paste, and then click Paste Special.
-
Click Picture (Enhanced Metafile), and then click OK. (Enhanced metafile format helps to prevent the pasted table image table from degrading.)
-
Under Picture Tools, on the Format tab, in the Arrange group, click Group
 , and then click Ungroup
 .
.  When prompted to convert the picture to a Microsoft Office drawing object, click Yes. For more information about the conversion process, click Show Help.
-
Repeat the Ungroup command a second time. Selection handles will appear on all the individual cells in the table. Click outside the table to clear these selections.
-
Press and hold the Ctrl key while you select the parts of the table that you want to animate.
-
On the Animations tab, in the Advanced Animations group, click Add Animation to open the menu of animation options:
-
To make the shapes enter with an effect, point to Entrance, and then click an effect.
-
To add an effect (such as a spin effect) to the shapes, point to Emphasis, and then click an effect.
-
To add an effect that makes the shapes leave the slide at some point, point to Exit, and then click an effect.
-
To add an effect that makes a shape move in a specified pattern, point to Motion Paths, and then click a path.
-
To make the shapes enter with an effect, point to Entrance, and then click an effect.
-
On the Timing tab, click any additional options that you want to use, such as Duration or Delay.
-
Repeat steps 8 through 10 for any other elements of the table that you want to animate separately.Remove the original table from the duplicate slide, so that the duplicate slide only has the new enhanced metafile version of the table on it.
or
otherwise you can create a table first time then in the lower you can animated your words or other then move to the table.
Sunday, February 12, 2017
how to animate individual cells, rows, or columns in my table in powerpoint
Tuesday, January 3, 2017
USB drive bootable with Rufus Software
![[rufus screenshot]](https://rufus.akeo.ie/pics/rufus_en.png)
Rufus is a utility that helps format and create bootable USB flash drives, such as USB keys/pendrives, memory sticks, etc.
It can be especially useful for cases where:
- you need to create USB installation media from bootable ISOs (Windows, Linux, UEFI, etc.)
- you need to work on a system that doesn't have an OS installed
- you need to flash a BIOS or other firmware from DOS
- you want to run a low-level utility
Rufus Software Download Click Here
How to Create a Bootable USB Drive
To
create a bootable USB drive manually, we will use the Command Prompt as
a Windows default program. Here are step by step to create a bootable
USB drive as the Windows installation media. To create a bootable USB
drive as a Windows installation media, we require at least 4 GB for
minimum capacity. Larger capacity is better. At this moment, I use the
USB flash drive with 2 GB of capacity as just an example. It's due to
some reasons that my 4 GB flash drive encountered an unusual problem
that i have to fix later. :D
Step 1: Using DISKPART command

- Insert your USB flash drive to your running computer. As the first step, we need to run Command Prompt as administrator. To do this, we need to find cmd by typing 'cmd' in the search box on Windows Start Menu. After search result for 'cmd' appears, right click on it and select "Run as administrator".
- Type 'diskpart' on Command Prompt (without quotes) and hit Enter. Wait for a while until the DISKPART program run.
- Type 'list disk' to view active disks on your computer and hit Enter. There would be seen that the active disks shown as Disk 0 for hard drive and Disk 1 for your USB flashdrive with its total capacity.
- Type 'select disk 1' to determine that disk 1 would be processed in the next step then hit Enter.
- Type 'clean' and hit Enter to remove all of data in the drive.
- Type 'create partition primary' and hit Enter. Creating a primary partition and further recognized by Windows as 'partition 1'.
- Type 'select partition 1' an hit Enter. Choosing the 'partition 1' for setting up it as an active partition.
- Type 'active' and hit Enter. Activating current partition.
- Type 'format fs=ntfs quick' and hit Enter. Formatting current partition as NTFS file system quickly.
- Type 'exit' and hit Enter. Leaving DISKPART program but don't close the Command Prompt instead. We would still need it for next process.
Monday, September 5, 2016
How to display or hide sheet tabs and Sheet Tab Bar in Excel?
By default, Microsoft Excel shows sheet tabs at the bottom of the
worksheet, which is functioning for navigating between worksheets
quickly. Sometimes, the Sheet tabs may disappear by accident in Excel;
in contrast, you may want to hide some sheet tabs or the entire Sheet
Tab bar for some reasons. There are some useful tips to quickly display
or hide sheet tabs and Sheet Tab bar in Excel.
One click to hide/unhide one or multiple sheet tabs in Excel
Kutools
for Excel provides many handy utilities for Excel users to quickly
toggle hidden sheet tabs, hide sheet tabs, or display hidden sheet tabs
in Excel.
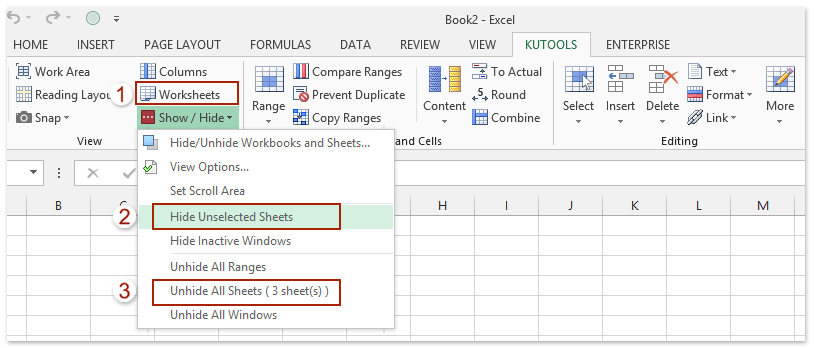
(1) Kutools > Worksheets: One click to toggle all hidden sheet tabs to be visible or invisible in Excel;
(2) Kutools > Show / Hide > Hide Unselected Sheets: One click to hide all sheet tabs except active one (or selected ones) in Excel;
(3) Kutools > Show / Hide > Unhide All Sheets: One click to display all hidden sheet tabs in Excel.
Hide one or multiple selected sheet tabs with Hide & Unhide feature
 And then you will see all selected sheet tabs are hidden from the Sheet Tab bar. See screenshot:
Display one hidden sheet tab with Hide & Unhide feature
1. Click Home > Format > Hide & Unhide > Unhide Sheet.
2. In the opening Unhide dialog box, select the sheet tab which you want to display in the Sheet Tab bar, and click the OK button. See screenshot:
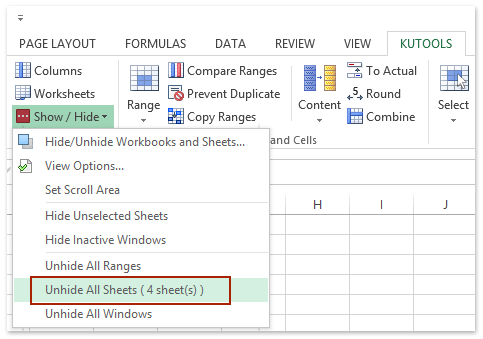
 Display all hidden sheet tabs with only one click
Just click Kutools > Show / Hide > Unhide All Sheets to batch display all hidden sheet tabs at once. See screenshot:
Free Download Kutools for Excel Now
(1) Kutools > Worksheets: One click to toggle all hidden sheet tabs to be visible or invisible in Excel;
(2) Kutools > Show / Hide > Hide Unselected Sheets: One click to hide all sheet tabs except active one (or selected ones) in Excel;
(3) Kutools > Show / Hide > Unhide All Sheets: One click to display all hidden sheet tabs in Excel.
Hide one or multiple selected sheet tabs with Hide & Unhide feature
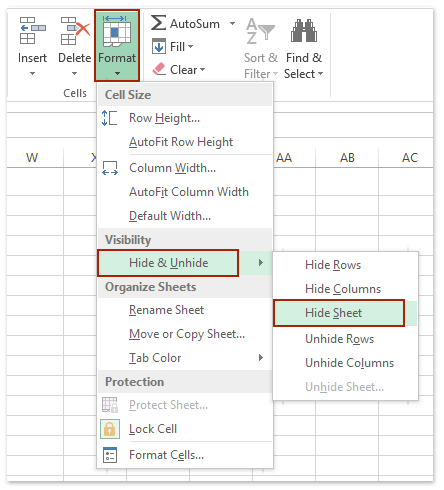
We can apply Excel’s Hide & Unhide feature to hide one or multiple selected sheet tabs easily.
1. Select one or multiple sheet tabs you will hide in the Sheet Tab bar.
Note:
(1) Holding the Shift key, you can select multiple adjacent sheet tabs with clicking the first sheet tab and the last one in the Sheet Tab bar;
(2) Holding the Ctrl key, you can select multiple nonadjacent sheet tabs with clicking each sheet tab in the Sheet Tab bar one by one.
2. Click Home > Format > Hide & Unhide > Hide Sheet. See screenshot:
Display one hidden sheet tab with Hide & Unhide feature
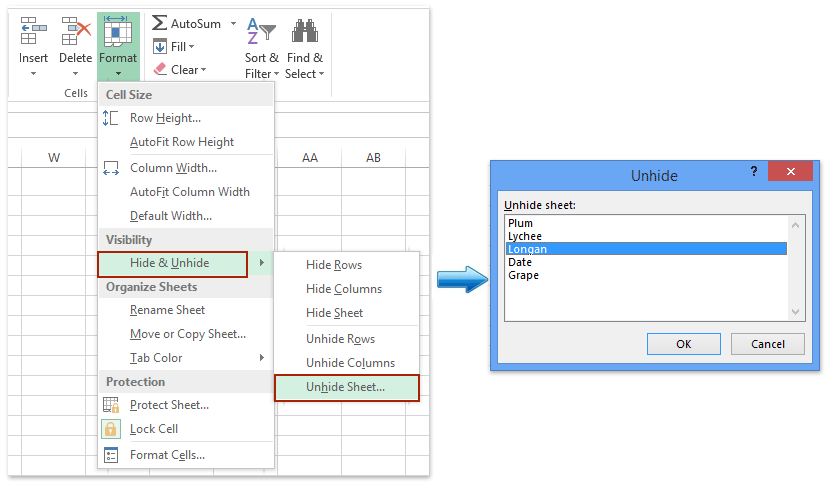
1. Click Home > Format > Hide & Unhide > Unhide Sheet.
2. In the opening Unhide dialog box, select the sheet tab which you want to display in the Sheet Tab bar, and click the OK button. See screenshot:
Hide all sheet tabs except active/selected one with only one click
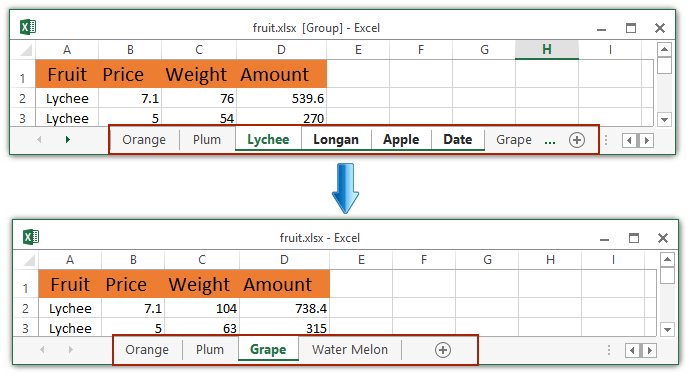
Just click Kutools > Show / Hide > Hide Unselected Sheets. And then all sheet tabs are hidden except the active one.
Note: For hiding all sheet tabs except selected ones, please select these sheet tabs you will not hide in the Sheet Tab bar, and then click Kutools > Show / Hide > Hide Unselected Sheets.
Free Download Kutools for Excel Now
Note: For hiding all sheet tabs except selected ones, please select these sheet tabs you will not hide in the Sheet Tab bar, and then click Kutools > Show / Hide > Hide Unselected Sheets.
Free Download Kutools for Excel Now
Just click Kutools > Show / Hide > Unhide All Sheets to batch display all hidden sheet tabs at once. See screenshot:
Free Download Kutools for Excel Now
 Display or hide the entire Sheet Tab Bar to display/hide all sheet tabs with Excel Options
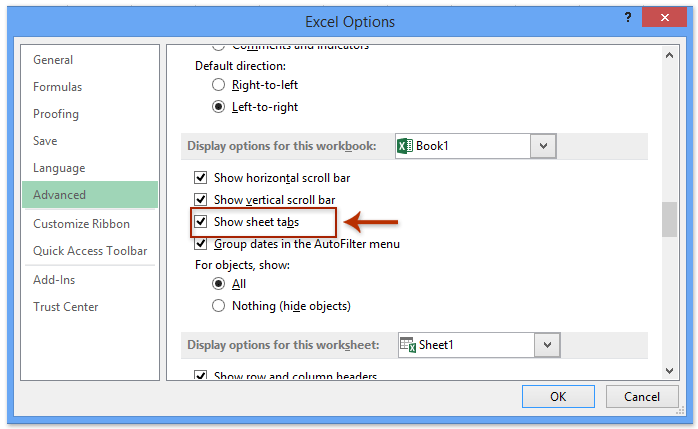
We can display or hide the entire Sheet Tab Bar to display/hide all sheet tabs by Excel's Options. Please do as follows:
1. Click the File > Options (or  > Excel Options) to open the Excel Options dialog box.
2. In the Excel Options dialog box, please do as follows:
(1) Click the Advanced in left bar;
(2) Check or uncheck the Show sheet tabs option in the Display options for this workbook section;
3. Click the OK button.
All of the worksheet tabs will be displayed or hidden.
> Excel Options) to open the Excel Options dialog box.2. In the Excel Options dialog box, please do as follows:
(1) Click the Advanced in left bar;
(2) Check or uncheck the Show sheet tabs option in the Display options for this workbook section;
3. Click the OK button.
All of the worksheet tabs will be displayed or hidden.
Display or hide the entire Sheet Tab Bar to display/hide all sheet tabs with VBA code
The following two simple VBA codes also can help you to hide or show the sheet tabs.
1. Click Developer > Visual Basic, and a new Microsoft Visual Basic for applications window will display, click Insert > Module, and then input the following codes in the module.
2. Then click Run button to run the code. You will get the result as you want.
1. Click Developer > Visual Basic, and a new Microsoft Visual Basic for applications window will display, click Insert > Module, and then input the following codes in the module.
VBA code to hide Sheet Tab Bar:
1
2
3
| Sub Macro()ActiveWindow.DisplayWorkbookTabs = FalseEnd Sub |
VBA code to show Sheet Tab Bar:
1
2
3
| Sub Macro()ActiveWindow.DisplayWorkbookTabs = TrueEnd Sub |
Where are my worksheet tabs?
First, see if the option is, in fact, turned off. To do this, click the Microsoft Office button
 , and then click Excel Options. In the Advanced category, under Display options for this workbook, look at the Show sheet tabs check box. Is it cleared? If so, select it, and then click OK.

, and then click Excel Options. In the Advanced category, under Display options for this workbook, look at the Show sheet tabs check box. Is it cleared? If so, select it, and then click OK.
Wednesday, August 3, 2016
Export contacts from Outlook 2013 and 2016
 Now look at Outlook on your computer:
- If your Outlook ribbon has a File option in the top left corner, then you're using a desktop version of Outlook and you're in the right place! See one of the procedures below to export your contacts.
Export contacts to a csv file or Excel
-
In Outlook 2013 or 2016 on a PC, choose File.
-
Choose Open & Export > Import/Export.

-
Choose Export to a file.

-
Choose Comma Separated Values.
-
THIS STEP IS KEY especially if you're borrowing a friend's computer: In the Select folder to export from box, scroll to the top if needed and select the Contacts folder that's under your account. Choose Next.

-
Choose Browse, name your file, and choose OK.

-
Confirm where your new contacts file will be saved on your computer, and choose Next.
-
Choose Finish to start exporting your contacts immediately. Outlook doesn't display any message when the export process is complete but the Import and Export Progress box goes away.

-
Locate the new .csv file on your computer and open it
with Excel to verify your contacts are there. You'll likely have a lot
of empty cells. That's normal.

-
Generally we recommend closing the file without saving
any changes; otherwise the file might get messed up and you won't be
able to use it for importing. If that happens you can always run the
export process again and create a new file.
You can use Excel to update the information in your .csv file. For tips about working with a list of contacts in Excel, see Create or edit .csv files.
-
If you borrowed a friend's computer with Outlook on it,
you can now remove your account from his version of Outlook. Here's how:
-
In Outlook on the desktop, choose File > Account Settings > Account Settings.
-
Choose the account you want to delete, and then choose Remove.
-
Choose Close.
-
In Outlook on the desktop, choose File > Account Settings > Account Settings.
- Now that your contacts are copied to a .csv file, you can import them to another computer with Outlook for Windows on it, or import them to another email service.
Sunday, June 19, 2016


How to Create a Virtual Machine on VMware Workstation
The New Virtual Machine Wizard guides you through the key steps for
setting up a new virtual machine on any hypervisor, you set various
options and parameters for that virtual Machine. You can then use the
virtual machine settings editor (VM > Edit Settings) if you
need to make any changes to your virtual machine’s setup like increase
RAM, Change Network type (NAT/Bridge/Host only), Increase harddisk etc.
You can details idea about Virtual machine from here
1. Start VMware Workstation from windows client.
Windows hosts: Double-click the VMware Workstation icon on your desktop or use the Start menu (Start > Programs > VMware > VMware Workstation).
When you start VMware Workstation, create a new one from File > New > Virtual Machine to begin creating your virtual machine.
2. The New Virtual Machine Wizard presents you with a series of screens that you navigate using the Next and Prev buttons at the bottom of each screen. At each screen, follow the instructions, then click Next to proceed to the next screen.
3. Select the method typical/Custom you want to use for configuring your virtual machine. basically used Custom for customized configuration. Otherwise you need to change later
4. Select the method of platform for hardware compatibility
5. Select Installation media/method. If you want to install from CD/DVD then chose “installer disk”. If you want to install from image/ISO then chose “installer Disk Image file (iso)”.
Note: For Windows server 2012 R2 you need select “I will install operating system Later”
6. Select Operating system type like Microsoft windows/Linux/Solaris etc from operating system list:
7. Choose a server/machine Name what you want Like If you want to make a Domain controller the you can mentioned name “DC” and select machine store location via browse
8. Select hardware firmware type BIOS/EFI
9. Select Number of Processor, Core etc. from drag menu
10. Set Virtual Machine memory size/ RAM size
11. Choose Network type
12. Select I/O controller type as LSI logic SASS
13. Specify the type of the virtual disk.
14. Specify the virtual disk as create new. If have existing HDD then choose existing and link that HDD
15. Specify the capacity of the virtual disk.
16. Specify the location of the virtual disk’s files.
17. Click Finish. If need to change then click customize hardware option and set changes
18. Your virtual machine is ready now:
You can details idea about Virtual machine from here
1. Start VMware Workstation from windows client.
Windows hosts: Double-click the VMware Workstation icon on your desktop or use the Start menu (Start > Programs > VMware > VMware Workstation).
- Start the New Virtual Machine Wizard.
When you start VMware Workstation, create a new one from File > New > Virtual Machine to begin creating your virtual machine.
2. The New Virtual Machine Wizard presents you with a series of screens that you navigate using the Next and Prev buttons at the bottom of each screen. At each screen, follow the instructions, then click Next to proceed to the next screen.
3. Select the method typical/Custom you want to use for configuring your virtual machine. basically used Custom for customized configuration. Otherwise you need to change later
4. Select the method of platform for hardware compatibility
5. Select Installation media/method. If you want to install from CD/DVD then chose “installer disk”. If you want to install from image/ISO then chose “installer Disk Image file (iso)”.
Note: For Windows server 2012 R2 you need select “I will install operating system Later”
6. Select Operating system type like Microsoft windows/Linux/Solaris etc from operating system list:
7. Choose a server/machine Name what you want Like If you want to make a Domain controller the you can mentioned name “DC” and select machine store location via browse
8. Select hardware firmware type BIOS/EFI
9. Select Number of Processor, Core etc. from drag menu
10. Set Virtual Machine memory size/ RAM size
11. Choose Network type
12. Select I/O controller type as LSI logic SASS
13. Specify the type of the virtual disk.
14. Specify the virtual disk as create new. If have existing HDD then choose existing and link that HDD
15. Specify the capacity of the virtual disk.
16. Specify the location of the virtual disk’s files.
17. Click Finish. If need to change then click customize hardware option and set changes
18. Your virtual machine is ready now:
How to Install Zabbix Server 3.0 on linux environment
At first update all package on your system
[root@localhost ~]#yum -y update
[root@localhost ~]#rpm –import http://repo.zabbix.com/RPM-GPG-KEY-ZABBIX
Retrieving http://repo.zabbix.com/zabbix/3.0/rhel/7/x86_64/zabbix-release-3.0-1.el7.noarch.rpm
Preparing… ################################# [100%]
Updating / installing…
1:zabbix-release-3.0-1.el7 ################################# [100%]
How to Install Zabbix Server 3.0 on linux environment
[root@localhost ~]# systemctl enable mariadb
[root@localhost ~]# mysql_secure_installation
In order to log into MariaDB to secure it, we’ll need the current
password for the root user. If you’ve just installed MariaDB, and
you haven’t set the root password yet, the password will be blank,
so you should just press enter here.
Enter current password for root (enter for none):
OK, successfully used password, moving on…
Setting the root password ensures that nobody can log into the MariaDB
root user without the proper authorisation.
Set root password? [Y/n] Y
New password:
Re-enter new password:
Password updated successfully!
Reloading privilege tables..
… Success!
Remove anonymous users? [Y/n] Y
… Success!
Disallow root login remotely? [Y/n] Y
… Success!
Remove test database and access to it? [Y/n] Y
– Dropping test database…
… Success!
– Removing privileges on test database…
… Success!
Reload privilege tables now? [Y/n] Y
… Success!
Cleaning up…
How to Install Zabbix Server 3.0 on linux environment
All done! If you’ve completed all of the above steps, your MariaDB
installation should now be secure.
[root@localhost ~]# mysql_secure_installation
MariaDB [(none)]>
MariaDB [(none)]> create database zabbix_db;
Query OK, 1 row affected (0.00 sec)
MariaDB [(none)]> grant all privileges on zabbix_db.* to zabbix@localhost identified by ‘redhat’;
Query OK, 0 rows affected (0.00 sec)
MariaDB [(none)]> flush privileges;
Query OK, 0 rows affected (0.00 sec)
MariaDB [(none)]> exit
[root@localhost ~]# cd /usr/share/doc/zabbix-server-mysql-3.0.2/
[root@localhost zabbix-server-mysql-3.0.2]# gunzip create.sql.gz
[root@localhost zabbix-server-mysql-3.0.2]# mysql -u root -p zabbix_db < create.
sql
[root@localhost ~]#yum -y update
[root@localhost ~]#rpm –import http://repo.zabbix.com/RPM-GPG-KEY-ZABBIX
Installing repository configuration package
Install the repository configuration package. This package contains yum configuration files.
[root@localhost ~]# rpm -ivh http://repo.zabbix.com/zabbix/3.0/rhel/7/x86_64/zabbix-release-3.0-1.el7.noarch.rpmRetrieving http://repo.zabbix.com/zabbix/3.0/rhel/7/x86_64/zabbix-release-3.0-1.el7.noarch.rpm
Preparing… ################################# [100%]
Updating / installing…
1:zabbix-release-3.0-1.el7 ################################# [100%]
Installing Zabbix packages
Now Install Zabbix packages. Example for Zabbix server and web frontend with mysql database.
[root@localhost ~]# yum -y install zabbix-server-mysql zabbix-web-mysql mysql mariadb-server httpd phpHow to Install Zabbix Server 3.0 on linux environment
Creating initial database
Create zabbix database and user on MySQL. For instructions on doing that,
[root@localhost ~]# systemctl start mariadb[root@localhost ~]# systemctl enable mariadb
[root@localhost ~]# mysql_secure_installation
In order to log into MariaDB to secure it, we’ll need the current
password for the root user. If you’ve just installed MariaDB, and
you haven’t set the root password yet, the password will be blank,
so you should just press enter here.
Enter current password for root (enter for none):
OK, successfully used password, moving on…
Setting the root password ensures that nobody can log into the MariaDB
root user without the proper authorisation.
Set root password? [Y/n] Y
New password:
Re-enter new password:
Password updated successfully!
Reloading privilege tables..
… Success!
Remove anonymous users? [Y/n] Y
… Success!
Disallow root login remotely? [Y/n] Y
… Success!
Remove test database and access to it? [Y/n] Y
– Dropping test database…
… Success!
– Removing privileges on test database…
… Success!
Reload privilege tables now? [Y/n] Y
… Success!
Cleaning up…
How to Install Zabbix Server 3.0 on linux environment
All done! If you’ve completed all of the above steps, your MariaDB
installation should now be secure.
[root@localhost ~]# mysql_secure_installation
MariaDB [(none)]>
MariaDB [(none)]> create database zabbix_db;
Query OK, 1 row affected (0.00 sec)
MariaDB [(none)]> grant all privileges on zabbix_db.* to zabbix@localhost identified by ‘redhat’;
Query OK, 0 rows affected (0.00 sec)
MariaDB [(none)]> flush privileges;
Query OK, 0 rows affected (0.00 sec)
MariaDB [(none)]> exit
[root@localhost ~]# cd /usr/share/doc/zabbix-server-mysql-3.0.2/
[root@localhost zabbix-server-mysql-3.0.2]# gunzip create.sql.gz
[root@localhost zabbix-server-mysql-3.0.2]# mysql -u root -p zabbix_db < create.
sql
Starting Zabbix server process
Edit database configuration in zabbix_server.conf
[root@localhost ~]# vi /etc/zabbix/zabbix_server.conf
DBHost=localhost
DBName=zabbix
DBUser=zabbix
DBPassword=zabbix
Editing PHP configuration for Zabbix frontend
Apache configuration file for Zabbix frontend is located in /etc/httpd/conf.d/zabbix.conf. Some PHP settings are already configured.
php_value max_execution_time 300
php_value memory_limit 128M
php_value post_max_size 16M
php_value upload_max_filesize 2M
php_value max_input_time 300
php_value always_populate_raw_post_data -1
# php_value date.timezone Asia/Dhaka

After changing the configuration file restart the apache web server.
Install Zabbix Server 3.0 on linux
[root@localhost ~]# systemctl start httpd

Finally Start Zabbix server process by
[root@localhost ~]#service zabbix-server start


Now you login your zabbix and install web content with Database.
Sunday, June 5, 2016
How to Show My Computer Icon on Windows 2012, R2 Server
As mentioned earlier, this feature is not included by default. If you
can manage the server without My computer icon on desktop or other
personalization options, better continue with it without installing
additional features. But if you desperately want my computer icon then
follow these steps.
We must install ‘Desktop Experience’ feature to get back personalization options which will help to get My computer back on Windows 2012 R2 server desktop.
Go to ‘Add Roles and Features’ in server dashboard, select ‘Role-based or Feature-based installation’ , do not select anything in Server Roles, and under Features select ‘Desktop Experience’ as mentioned below.

Install other required features too.
You must restart the server after the installation.

Even though this feature would have added several options but our concern is to get My computer icon on desktop.
After the restart you must be seeing the ‘Personalize’ from right click menu from desktop (which was not shown in earlier screenshot).

Click on Personalize and ‘Change desktop icons’ at top left corner. It will bring back our traditional desktop icons settings like Windows 7 or 8.
Select the icons you want to show, in our case it is My Computer icon.

That will show My computer icon on Windows 2012 and R2 server desktop.
We must install ‘Desktop Experience’ feature to get back personalization options which will help to get My computer back on Windows 2012 R2 server desktop.
Go to ‘Add Roles and Features’ in server dashboard, select ‘Role-based or Feature-based installation’ , do not select anything in Server Roles, and under Features select ‘Desktop Experience’ as mentioned below.
Install other required features too.
You must restart the server after the installation.
Even though this feature would have added several options but our concern is to get My computer icon on desktop.
After the restart you must be seeing the ‘Personalize’ from right click menu from desktop (which was not shown in earlier screenshot).
Click on Personalize and ‘Change desktop icons’ at top left corner. It will bring back our traditional desktop icons settings like Windows 7 or 8.
Select the icons you want to show, in our case it is My Computer icon.
That will show My computer icon on Windows 2012 and R2 server desktop.
Saturday, May 14, 2016
Protection from Ransomware Malware
Ransomware is a type of malware
that can be covertly installed on a computer without knowledge or
intention of the user that restricts access to the infected computer
system in some way, and demands that the user pay a ransom to the malware operators to remove the restriction. Some forms of ransomware systematically encrypt files on the system's hard drive, which become difficult or impossible to decrypt without paying the ransom for the encryption key, while some may simply lock the system and display messages intended to coax the user into paying. Ransomware typically propagates as a Trojan,
whose payload is disguised as a seemingly legitimate file; thus,
ransomware is an access-denial type of attack that prevents legitimate
users from accessing files.
While initially popular in Russia, the use of ransomware scams has grown internationally;in June 2013, security software vendor McAfee released data showing that it had collected over 250,000 unique samples of ransomware in the first quarter of 2013, more than double the number it had obtained in the first quarter of 2012. Wide-ranging attacks involving encryption-based ransomware began to increase through Trojans such as CryptoLocker, which had procured an estimated US$3 million before it was taken down by authorities,and CryptoWall, which was estimated by the US Federal Bureau of Investigation (FBI) to have accrued over $18m by June 2015.
if you think that you are attacked by this virus or your server is attacked please search that highlighting file *.Locky ,_HELP_instructions.html or DDHMTTF.exe
Please delete that file if you find that .
or if you use the mcafee antivirus please update the antivirus and the update version is 8164.
** This is to alert you that a spam email is currently being spreading globally from some malicious domains ( eg. wdru30918773@gaetanosonline) attached a word document file, notepad, *.zip, *.rar ,*.docm with it and the subject of the emails are like: Invoice, Ref. 54468561or bank statement or picture
So,
if you got this type of email. Immediately delete it without opening the
attachment file ASAP.
Subscribe to:
Posts (Atom)
how to animate individual cells, rows, or columns in my table in powerpoint
Duplicate the slide that has the table you want to animate. Leave the first instance of the slide untouched. For now, it ...
-
Duplicate the slide that has the table you want to animate. Leave the first instance of the slide untouched. For now, it ...

